
Tiling a floor is more straightforward than it seems if you have the right tools. Begin in the center of a clean, level area and work your way outwards.
While cutting tiles for corners and edges can be challenging, mastering this skill enables you to tackle DIY tiling projects. After laying the tiles, grouting them is the final step, followed by a bit of cleanup. Once you're comfortable with simple installations, you can confidently move on to more complex areas, such as shower walls or backsplashes, as well as wall tiling.
Today's floor tile options are stunning, from patterned ceramics to sleek porcelain, trendy encaustics, and natural stone. This guide will walk you through the steps to refresh your floor tile, regardless of your style preference.
Steps to Tile a Floor
Tile is an excellent choice for bathroom and kitchen floors, as well as high-traffic areas like entryways, mudrooms, and sunrooms. It's particularly practical in spaces that connect to the outdoors, making it easy to clean and resistant to stains, spills, and sun damage.
Taking on a tiling project yourself can save you a significant amount compared to hiring professionals, plus you'll gain valuable skills.
Your first step is gathering all necessary tools and materials, starting with selecting your tiles.
Essential Tools:
- Metal ruler or measuring tape
- Pencil or chalk
- Long spirit level or laser level
- Tile cutter
- Bucket
- Mixing stick or drill with mixer attachment
- Flat trowel
- Notched trowel
- Tile spacers
- Tile marker
- Sponge
- Safety goggles and gloves
- Grout float
- Grout finishing tool
1. Measure Your Space
Accurately measure your area to determine how many tiles you'll need. It's wise to add an extra 10% for mistakes and breakages, as noted by a tiling expert.
Many tile retailers have tile calculators on their websites, but remember to include any additional areas you want to tile, like alcoves or fireplaces.
When purchasing tiles, always opt for the same batch number to minimize color discrepancies.
2. Choose the Right Adhesives
Consult your tile supplier for the best adhesive, silicone (for the perimeter), and grout to ensure a secure fit, as different surfaces and tile types require distinct products. For instance, if you're tiling over underfloor heating, a flexible adhesive is essential.
Check the packaging for surface compatibility and drying times. Fast-drying adhesives may not be suitable for beginners who may need more time for adjustments.
When deciding between ready-mixed and powdered adhesive, remember that ready-mixed is often more costly and better for small jobs, while powdered options are more economical for larger areas.
3. Prepare Your Floor
Your floor must be flat, clean, and dry before tiling. Ensure there are no lumps or cracks.
Concrete, wood, and existing tiles can provide a suitable base for new floor tiles, provided they are free from dust and moisture. Use leveling compounds for uneven solid floors, or install tile backer board over wooden ones.
If your surface is dusty, vacuum it and apply diluted PVA adhesive before letting it dry. For areas exposed to water, such as showers, a tanking membrane is necessary.
4. Establish Your Starting Point
Before laying tiles, determine the alignment of your grout lines and how the tiles will meet walls and doorways.
Experts recommend starting from the room's center and performing a dry layout first. Measure carefully to find the center, using your straightest wall as a guide. If the walls aren't straight, consider using the door threshold to establish your tile line.
After marking the center tile line on the floor with chalk or pencil, adjust the center tile if necessary to ensure even spacing around the room's edges. If you cannot maintain half-tile gaps, prioritize alignment with the most visible wall. A wooden batten can help keep tiles aligned better than chalk lines.
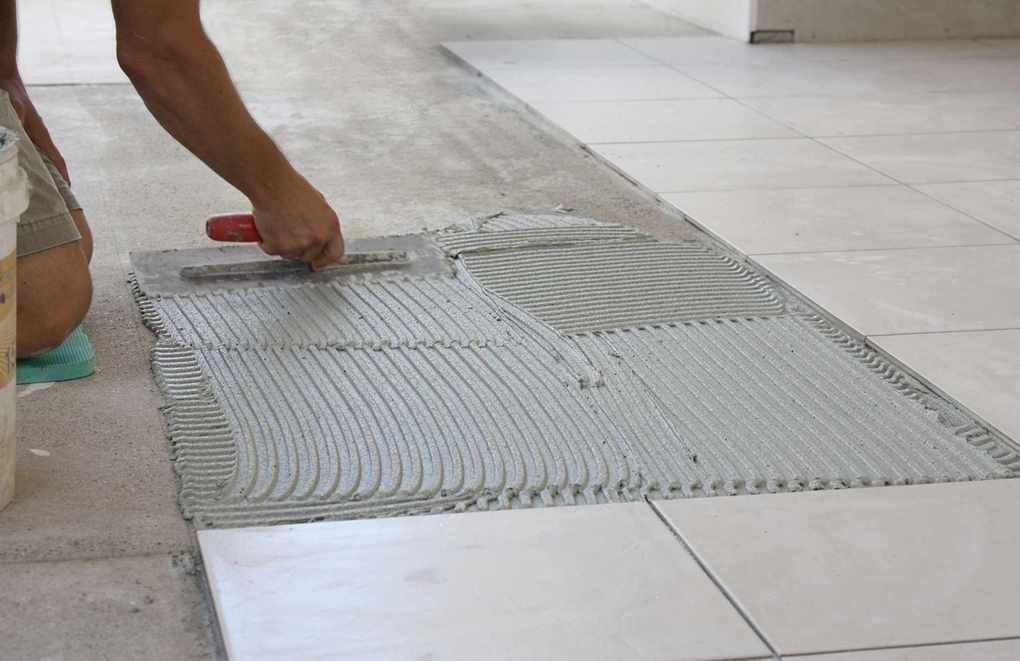
5. Begin Laying Tiles
Once your adhesive is mixed according to the package instructions, start tiling from your marked position. Apply adhesive where the first tiles will go, avoiding your chalk line if you're not using a batten.
Use a flat trowel to spread the adhesive, then a notched trowel to create grooves for even coverage.
Place tiles firmly, giving them a wiggle for a secure bond. Larger tiles may require adhesive on their backs as well.
With the initial tiles set, you can work in larger sections, aiming to cover about 3 square feet at a time, progressing towards the back of the room. This method helps prevent stepping on fresh tiles.
Place spacers between tiles and clean any excess adhesive with a damp cloth, ensuring you maintain alignment. Regularly check the tile alignment with a spirit level, and for larger areas, consider a laser level.
If tiles become misaligned, gently lift and adjust them as necessary.
6. Cutting Tiles
When you reach the walls or fixtures, cutting tiles will likely be necessary. Place the tile to be cut on top of a full tile and position another tile against the wall. Mark the tile to be cut using a tile pen.
Take your time and double-check measurements before cutting to avoid waste. Adding an 1/8 inch for spacers before cutting is advisable.
For thicker tiles, an electric tile cutter or heavy-duty cutter may be required, and always wear protective gear when cutting. Test the fit of your cut tile before securing it in place.
7. Grouting Preparation
Allow your tiles to dry completely before grouting, typically after 24 hours. Refer to adhesive instructions for specific drying times.
Use a grout float to work grout into the gaps, removing tile spacers as you go. Use a grout finisher or rubber spatula to smooth the lines and clean up excess grout, but wait for the grout to dry before doing a final clean.
8. Final Cleaning and Sealing
After the grout dries, wipe the tiles with a damp sponge or mop to remove any residue. For porous tiles like natural stone, apply a protective sealant. Some homeowners also seal grout lines to prevent stains.
Finally, seal the perimeter of your tiled floor with a flexible sealant to protect against water damage and tile movement.
Enhancing Your Tile Installation
You can achieve a high-end look without overspending when tiling a floor. A bit of creativity can elevate the appearance of budget tiles.
Consider using a contrasting grout color to add interest or coordinate colors for a seamless look. Once you're confident, try incorporating border tiles or feature tiles for added impact.


