Staining kitchen cabinets is a straightforward and economical method to breathe new life into your wooden cabinetry, shifting it from dull and worn to vibrant and refreshed.
Ideal for traditional aesthetics, wood stain allows for diverse color variations while showcasing the natural knots and grains of the wood. It enhances both color and texture, making it an excellent choice for revitalizing outdated furniture in your kitchen.
According to an interior design expert, proper preparation is crucial. Use a wood repair filler in a natural shade to conceal any surface imperfections. A furniture touch-up pen can help even out areas where the previous stain has faded. Next, apply a new coat of stain, opting for an interior wood stain to avoid harsh chemicals indoors, and follow the application instructions provided. A finishing wax will add an extra layer of protection to your cabinets.
We'll guide you through the process of staining kitchen cabinets step-by-step.
Steps to Stain Kitchen Cabinets
Staining is an excellent choice to refresh your kitchen without the hassle of removing old cabinets or installing new ones.
Using wood stain not only enhances the appearance of wood kitchen cabinets, similar to refinishing, but it also provides long-lasting protection.
A design expert shares a detailed guide on updating kitchen cabinets without replacement for real wood options.
You will need:
- TSP (Trisodium Phosphate)
- Microfiber cloths
- Drop cloths
- Protective gloves
- Chemical paint stripper (if needed)
- Paint scraper
- Palm sander (optional)
- Fine-grit sandpaper
- Medium-grit sandpaper
- Wood treatment
- Soft bristle paint brush
- Steel wool
- Wood stain
1. Clean and Protect
Begin by removing cabinet hardware including handles and knobs, storing them safely to avoid losing screws. If you're not replacing them, consider donating or selling the old pieces.
Next, cleanse the cabinets thoroughly. Kitchens often accumulate grease, so utilize a stronger cleaning agent than water. TSP, available as a spray or powder, is effective for this purpose.
Ensure you're wearing gloves and goggles while using TSP. After cleaning, any white residue leftover should be wiped away with a damp cloth before it dries.
If your cabinets aren't raw wood, you must strip away the existing finish, whether paint or stain, using an appropriate stripper before applying the new stain.
Protect your area by removing countertop appliances and laying down dust sheets to shield your flooring.
If needed, apply painter's tape to safeguard the areas where cabinets meet countertops and walls.
2. Prepare and Sand
Once the cabinets are clean and dry, sand them with 80 to 120-grit sandpaper. A palm sander can speed up this task, although it's not necessary.
Sand along the wood grain until the surfaces are smooth. For deep scratches or dents, apply wood filler, wait for it to dry, and then sand again.
Afterward, sand again using 150 to 220-grit paper. Use a vacuum to remove dust, and wipe the cabinets clean before allowing them to dry.
3. Treat the Wood
Once dried, treat the wood before staining. Given the kitchen's moisture and grease exposure, treating the wood is essential for durability. Apply wood treatments with a brush or cloth, following the manufacturer's instructions for coats and drying times.
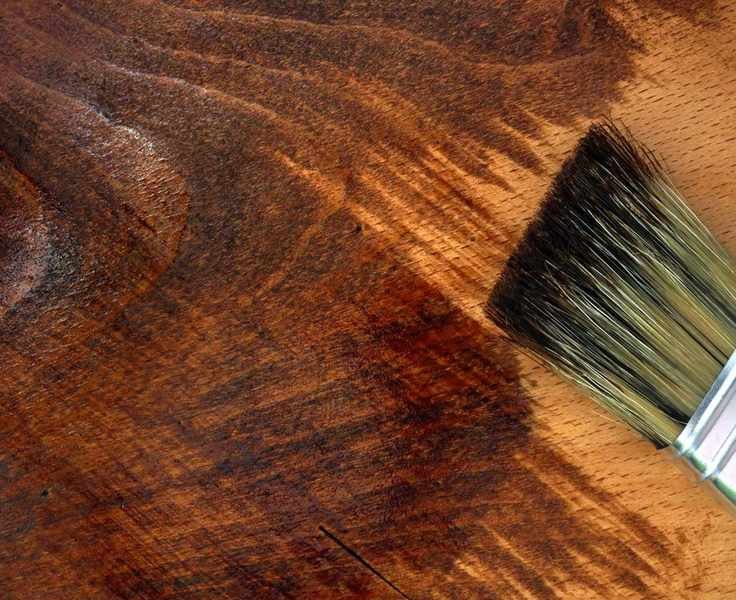
4. Stain the Wood
Apply the stain in a full, flowing coat, ensuring all surfaces are adequately covered. A high-quality, soft bristle brush works best. Avoid over-brushing to prevent streaks.
Work with the grain for an even finish. If any areas appear darker, you can lighten them by rubbing off excess stain with a fresh cloth.
Let the first coat dry for 2-4 hours before adding a second coat. Lightly scuff the surfaces with steel wool after the first coat before proceeding.
Some stains include a built-in sealer, eliminating the need for an additional topcoat, but always verify the product details.
Can You Stain Over Existing Kitchen Cabinets?
Yes, staining over existing cabinets is possible, but ensure you remove the old finish for optimal results.
Is It Difficult to Stain Kitchen Cabinets?
Staining kitchen cabinets is manageable for most DIY enthusiasts. Success hinges on thorough preparation, selecting the right stain and brush, and applying a top coat if necessary. If you're unsure about staining cabinets in place, consider removing doors and drawer fronts for better results.
Is Staining Kitchen Cabinets a Good Idea?
Absolutely! Staining provides a durable finish, making it easy to touch up any marks or scuffs over time.
What is the Best Stain for Kitchen Cabinets?
Water-based stains are recommended for kitchen cabinets, but ensure the stain matches your wood finish for best results.